|
Northern
Eclipse Help Reference |
|
Calibration is done by capturing a picture with known dimensions on it and then calibrating the software to the dimensions. The system is designed to calibrate pixel measurements to any unit value (microns, millimeters, centimeters, or any other unit value). For compound microscopy a micrometer slide is the common tool used, and for stereo or macro microscopy an accurate glass scale or ruler may be used.
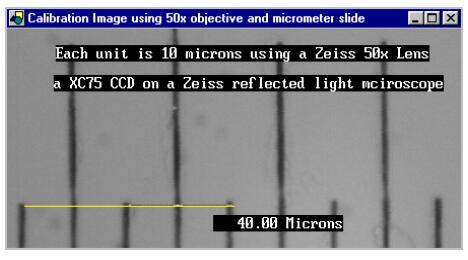
To calibrate, capture an image of a scale. In the example shown, a picture of a micrometer slide was captured from a Zeiss microscope using a 50x objective and a 1x relay lens.
![]()
Next, click on the Distance Calibration icon from the Toolbox and the following Calibrate Distance menu will appear.
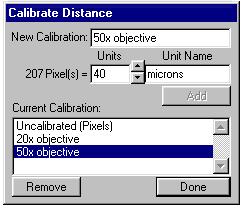
Draw a straight line with the mouse on the image of the calibration slide. Drawing the line as straight as possible is important. Use the end points of the scale to make the line perpendicular to the scale. Be sure to draw the line such that the starting point is at the top of one scale line and then ending point is at the top of the finishing scale line. It is also acceptable to draw the calibration line from the bottom of a starting calibration scale line to the bottom of a finishing scale line, but it is not acceptable to split the lines (i.e. Do not use the center of the scale lines). After the scale line has been drawn, enter in under the New Calibration space the objective used (or any other Calibration identifier). Under Units, type in or use the up or down arrows to set the number of units that represent the length of the line. Next, type in under Unit Name the type of units used. Finally, click on Add, and then on Done. (Note: The order is important!) The system will now be calibrated, and Current Calibration settings will show each type of calibration that has been setup. (Usually each objective of the microscope would be calibrated and listed for.) To switch between calibrations in the future, click on the Distance Calibration icon, then pick the calibration of choice with the mouse cursor and click on Done. The system will now be calibrated using the new calibration choice.
![]()
Note: After calibrating, always check the calibration using the Line Measuring Tool on a known standard. In other words, measuring 10 microns on a micrometer slide with the Line Measuring Tool would ensure that the system has been calibrated properly on the sample image.
Hints: Save an image of the micrometer slide from each magnification of the microscope. Calibrate for each microscope objective, and then pick that objective in the Calibration Distance Menu as required. Once the system has been calibrated, the last calibration setting will be saved even when the computer is turned off and then on again. For macro (large objects) applications, use a ruler under a macro stand and the appropriate lens.
|
See Also |
|
|
References |
Table of Contents |