|
Northern
Eclipse Help Reference |
Deconvolution Plugin |
Digital De-Convolution Plugin
Northern Eclipse supports a number of plugin options including Digital De-Convolution. This plugin option generally requires the microscope to have a motorized Z-motor and the Z-Capture application from Empix Imaging Inc. in order for Northern Eclipse to capture multiple images of a pre-defined distance apart.
There are a number of published de-convolution algorithms some of which include: nearest neighbor, blind de-convolution, and full iterative stack de-convolution. The Digital De-Convolution plugin, shipped with Northern Eclipse 6.0, allows for 2D iterative (no neighbor) and Nearest Neighbor Iterative. Also available, for an added fee, is the Full stack iterative plugin which uses full stack mathematics and is generally viewed as one of the best methods for rendering images.
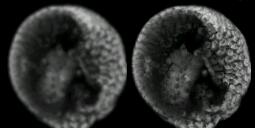
To create a three-dimensionally reconstructed deconvolved image set, the following steps are required. Using the following application or a script, capture a stack of fluorescent images from a motorized microscope.
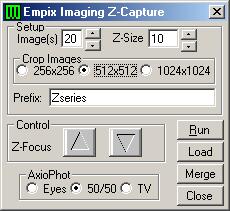
The Z-Capture application allows a set number of images to be captured in the Z direction. The Z-Size is based on the minimum step size of the z-motor in use (Zeiss Axioplan 50nm, Zeiss Axioplan 25nm, Zeiss Axioskop 100nm, Ludl micro-stepper is 10,000 steps per revolution and if a 360 degree turn of the microscope fine focus is 200 microns then each step is 0.02 microns). In the Prefix box, enter a prefix name for the images to be captured (They will be named prefix001.tif, prefix002.tif etc.). Run will start the z-capture application, requesting the operator to focus the microscope on the bottom of the stack to capture. In most cases, turn the microscope fine focus knob forward until the specimen starts to go out of focus. If after clicking on Run, things are not setup appropriately (i.e. exposure, gain, microscope etc.), there will be an option to stop the acquisition. If the stack capture is allowed to proceed, then a full set of images will be captured based on the number pre-set by the Image(s) value, and the microscope focus will be moved back to the original starting position. Images are saved individually on the hard drive, and the full stack of images will be placed in the Northern Eclipse image viewing area. Movie Control can be used to animate the images at this point (See Movie Control).

Other features of the Z-Control application:
Load is used to load a stack of images with the current Prefix name. Merge is used to merge stacks of different fluorescent wavelengths or colors. This is generally used to merge different fluorescent wavelengths of the same specimen after de-convolution to create a multi-parameter color image for 3D re-construction. Close will close the z-capture application. Using the up or down Control buttons the z-motor will move up or down the value set in the Z-Size window. The appearance of this application changes slightly, depending on the z-motor or microscope and camera in use. The sample shows prism control of the Carl Zeiss AxioPhot microscope. The Crop selection will appear if a Digital camera is in use (a digital camera is highly recommended for digital de-convolution), and with this checkbox selected the captured set of images will be cropped to the center of the field. Digital de-convolution uses a lot of CPU memory, so it is best to use small image region sizes for faster processing.
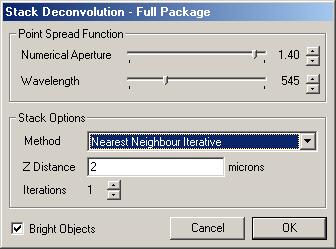
Be sure that Northern Eclipse has been calibrated with a micrometer slide for the microscope objective in use. If the system has not been calibrated, see Distance Calibration in the manual or online help. Click on Plugins in Northern Eclipse and then Deconvolve Image, and then the following dialog box will appear.
Note, that at this point the image stack should currently be in the Northern Eclipse image viewing area either from having just run the z-capture application, or loading an image stack from disk.
The Point Spread Function equation is calculated from known variables and each of these variables must be set prior to clicking on the “OK” button. The Numerical Aperture slide bar should be set to the numerical aperture of the objective in use. This value can be read directly from the objective. Wavelength should be set to the emission wavelength of the fluorescent filter set in use. Enter the Z Distance into the appropriate box. Iterations should be set to 1 because generally only one pass is required to de-convolve a stack of images. When all the settings are correct, click on OK and the image set will begin to be de-convolved. This process may take a long time depending on how much memory is in the computer and how fast the CPU is. For fast processing a Pentium III 800 or better is recommended with 2 Gigabytes of memory running on Windows 2000 or later. Once the image set has been deconvolved, use the Movie Control to 3 dimensionally reconstruct the stack.
|
See Also |
|
|
References |