|
Northern
Eclipse Help Reference |
Mutech MV-1500 |
MV-1500 I/O Card Installation
First, with the computer turned off, install the I/O card in a PCI slot. After the card has been installed, the next time Windows runs, new hardware will be found and there will be a driver request. The driver can be found on the Northern Eclipse CD (D:\Drivers\Mutech\MV 1400). When prompted, supply this as the path to the driver. After re-booting, load Northern Eclipse from the same installation CD.
CD-Installation Steps
1/ Insert your Northern Eclipse CD. On most computers it will auto load, but if it does not, double click on the file entitled ECDGUIDE.EXE in the root directory of the CD.
2/ Click on the first Icon “Install Northern Eclipse 6.0”. Once Northern Eclipse begins to install, click on “Next” then, at the Setup Type window, leave the bullet choice at Typical and click “Next”. At this point all of the files will be loaded into c:\eclipse. Click on Finish to complete the installation. Northern Eclipse is now ready to run, but it will only run as offline software (i.e. without camera control). Offline use installation is finished except for some possible personal configurations within Northern Eclipse.
3/ Install the software protection key. A software protection key or
software protection card is included with each new purchase, and is required
for Northern Eclipse to run. The key comes in one of three forms: an ISA card,
a parallel port key or a USB key.
Your computer should be able to accommodate at least one of these and if
we supply the computer we provide you with the appropriate key. The ISA card must be installed in an
8-bit ISA computer slot. We suggest installing the software protection card in
a slot that does not have access to the back plane of the computer case in
order to leave more slots available for other uses (i.e. A hidden slot if
available, or the ISA slot beside the middle PCI slot!). At the present time,
most new computers do not have ISA slots so unless otherwise requested we will
ship the software protection parallel port keys or USB keys. The parallel port
software protection key plugs into a printer port on your computer. A printer
can then be attached to the key, and it should not interfere with
printing. The USB key attaches to
any available USB port on your computer.
Once the key is connected you may need to also install a key driver. If you are running Windows NT/2000/XP you will get the Hardware Protection Key not Found message and Northern Eclipse will not run until you also install the key driver. Windows 95/98/Me does not require a driver to be loaded.
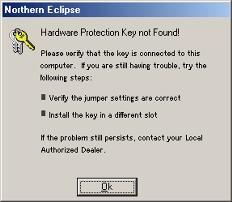
The driver is located on the installation CD and can be installed by selecting “Install Hardlock Driver for NT/2000/XP”
4/ Add MV-1500 Camera support
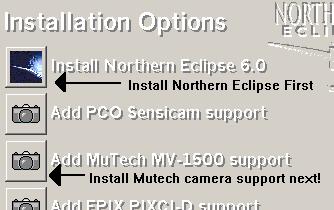
Click on “Add MuTech MV-1500 support” to install either a DVC or Hamamatsu RS422 digital camera. Once camera support has been added, run Northern Eclipse and then click Acquire, Camera Options, and then Configure, insuring that Northern Eclipse Mutech MV1500 is highlighted. The following menu will then appear.
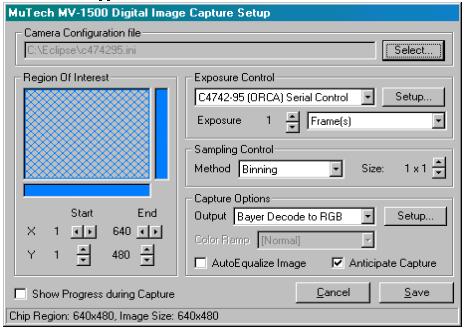
Camera Configuration
File
With the MV-1500 digital frame grabber, a file is required to be selected depending on the camera being used. The files supplied are c474295.ini and dvc1300c.ini for the Hamamatsu Orca camera and DVC cameras. For other cameras, ini files can be downloaded from the Mutech web page.
Exposure Control
Most often Exposure Control for the DVC camera is by way of serial communication, so DVC Serial Control is the standard setup. (With proper cable set the DVC1300 or DVC1300C can be controlled by parallel port communications.) The default serial communications setup for the DVC and Hamamatsu cameras is Port com2, Speed 9600, Parity None, Data Bits 8, Stop Bits 1, Handshaking None. Only the Port would every have to be changed, and this can be done by clicking on Setup, and then changing the Port setting to com1. DVC camera exposures can be changed by adjusting frame times. Each frame time from the DVC camera is 1/12 of a second. Note, that the DVC camera should be left in the Frame(s) setting. For the Hamamatsu camera, select the C4742-95 (ORCA) Serial Control communications and exposure can be changed to milliseconds.
Sampling Control
By means of Northern Eclipse, it is possible to sample images during capture from the DVC or the Hamamatsu cameras by either Binning or Reduction. Binning is used to increase camera sensitivity by the accumulation data from groups of pixels. The 1x1 binning is the normal full image acquisition. By setting binning to 2x2, sensitivity would increase by 75% and the image size would be reduced in size by 75% (i.e. a 1280x1024 image would be reduced in size to 640x512). Reduction is a pixel reduction method that does not increase sensitivity, but increases image frame throughput by reducing the actual image size just as binning does. In both case, image frame throughput (or frames captured per second) is increased as the binning or reduction setting is increased.
Capture Options
For the Color CCD detector chips, Output should be set to Bayer Decode to RGB, and for the Monochrome detector chips, Output should set to either [No Conversion] or Convert to 8 Bit. With the monochrome cameras no further Setup is required. With the Color CCD cameras Setup should be clicked, and the following default menu settings will appear:
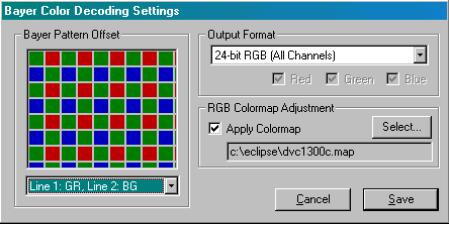
Bayer Pattern Offset
The Bayer Pattern Offset will have to set accordingly. Generally the top choice (Line1: GR, Line 2: BG) is used with the Sony interline transfer chip. If the wrong pattern is chosen, the result will be incorrect color decoding and thus colors will be displayed incorrectly while running the camera, but the fix is easy by picking an alternate pattern.
Output Format
The default format is 24-bit RGB (All Channels). This format forces the camera to capture true 24 bit color images with each color channel being 8 bits deep. Other options are as follows:
48-bit RGB (All
Channels) -produces 48 bit color images with each channel 16 bits deep.
48-bit RGB (Partial) -produces
48 bit color images with each definable channel 16 bits deep.
24-bit RGB (All
Channels) -produces 24 bit color images with each channel 8 bits deep.
24-bit RGB (Partial) -produces
24 bit color images with each definable channel 8 bits deep.
16-bit Monochrome -produces
16 bit images of a defined color channel monochrome source.
8-bit Monochrome -produces
8 bit images of a defined color channel monochrome source.
RGB Colormap
Adjustment
The Apply Colormap checkbox is used to apply a color map to incoming images that are either captured through Snap, Auto Expose, Loop, or Digital Focus. DVC cameras, as well as many other cameras (i.e. Qimaging, PCO, Hamamatsu, Optronics), use the Sony interline transfer chip. This chip is more sensitive in the green and less sensitive in the red and blue area of the visible light spectrum. (This chip is also very sensitive in the IR, but generally the camera is shipped with an IR reduction filter.) To balance colors, Northern Eclipse allows a custom color map (look up table or LUT) to be used for color balance during acquisition The default color map is the dvc1300c.map, but this can be changed to any color map supplied with Northern Eclipse (files *.map in the c:\eclipse subdirectory), or maps made using the Colormap Editor from within Northern Eclipse. Note that the color map chosen here is changed on the fly when color balance is done while using Digital Focus from within Northern Eclipse, therefore it is advisable to either use the default dvc1300.map or a new one made with the Colormap Editor.
The AutoEqualize Image checkbox, when checked, will auto balance images during capture. This setting should be left unchecked unless lighting conditions are very weak. Increasing Gain, Exposure and, as a last resort, Offset while using Digital Focus or Loop should produce better results.
Region Of Interest
It is possible with the DVC or Hamamatsu camera using Northern Eclipse to select a partial region of the chip. This can be done in a number of ways. Using the mouse place the cursor in the blue hatched region of interest window, and then holding down the mouse button drag from the upper left corner down toward the lower right corner. A region selection can also be made by adjusting the Start or End XY spinner controls. Region selection can also be performed by way of a macro, Windows script, or OLE application.
Progress Bar
The Show Progress during Capture checkbox when checked, will show a progress bar while capturing images. This feature is useful for long exposures, but is generally left unchecked for normal use.